

You may have noticed, since I have been banging on about it so much, that I have bought myself a Kindle, yay! Now, I want to look after my new toy, but the cases for it are pretty pricey, so I decided to make my own, and I am really happy with how it turned out. Lucky for you lot I remembered to take photos throughout the process, so you can make it too! I used a similar process to this tutorial I did a little while ago for an iphone stand.

To make the base
You will need;
- A piece of material measuring at least 49cm x 38cm
- 2 pieces of strong cardboard measuring 12cm x 17.5cm
- 1 piece of strong cardboard measuring 11cm x 17.5cm
- 1 piece of cardboard measuring 1cm x 17.5cm
- 1 piece of cardboard measuring 1.7cm x 17.5cm
- A needle and thread or a sewing machine
- Velcrow
To make the inside panel with elastic corner straps
You will need;
- A piece of thin cardboard Measuring 11.5cm x 16.7cm
- A Glue Gun
- Felt or a scrap of fabric
- A long piece of elastic
Making The Base

The base of this is basically going to be an rectangular pocket which we will then slip our pieces of cardboard into. Your card pieces should look like the below. I just used cardboard box card, but the stronger the card you use the better. Use a craft knife, ruler and mat to cut the correct sizes. With your card ready, you now want to get your fabric and fold it in half with the wrong side of the fabric facing out. Place your cardboard in a row against the fold as below, then draw around the cardboard onto the fabric, then pin along the lines you have drawn, catching both sides of the fabric. Now trim around the edges of the line, leaving about 1 cm around the bottom and the side and a few inches above the cardboard, which will become the opening. Don't sew along the top yet!
  Now you are going to sew along the lines you have drawn. You can use a sewing machine but I just used a needle and thread. To make sure it was the right size I sewed the bottom line, then inserted the card inside the fabric so that I could follow the line of the card when sewing up the side. Below you can see the finished 'pouch'. Now you are going to turn it inside out so that the right side of the fabric is on the outside. Use the end of a pencil to poke the corners out, you might also want to trim the edges of the fabric at this point so that the corners turn out properly.
 With your card ready, you now want to get your fabric and fold it in half with the wrong side of the fabric facing out. Place your cardboard in a row against the fold as below, then draw around the cardboard onto the fabric, then pin along the lines you have drawn, catching both sides of the fabric. Now trim around the edges of the line, leaving about 1 cm around the bottom and the side and a few inches above the cardboard, which will become the opening. Don't sew along the top yet! Now you are going to sew along the lines you have drawn. You can use a sewing machine but I just used a needle and thread. To make sure it was the right size I sewed the bottom line, then inserted the card inside the fabric so that I could follow the line of the card when sewing up the side. Below you can see the finished 'pouch'. Now you are going to turn it inside out so that the right side of the fabric is on the outside. Use the end of a pencil to poke the corners out, you might also want to trim the edges of the fabric at this point so that the corners turn out properly.
Next we are going to re-insert the cardboard into the pocket. The order should go; Large rectangular piece, largest thin piece, large rectangular piece, smaller thin piece, large rectangular piece. In between each piece of cardboard we need to make a hinge. So sew along using the edge of the cardboard as a guide, be careful not to make it too tight or loose. When you get to the end you will need to use a backstitch, making sure the edges are tucked in neatly. See step 7 of this tutorial for a better idea. When finished the base should look something like the below, and should fold up around your kindle.
 When finished the base should look something like the below, and should fold up around your kindle.
Now we need to make something for the Kindle to be held in with. Get your piece of thin card and your felt/spare fabric. Cut the fabric so that it looks like the below picture.

Now you will need to get out the glue gun and glue each side down, pulling tightly to make the fabric nice and taut at the front.

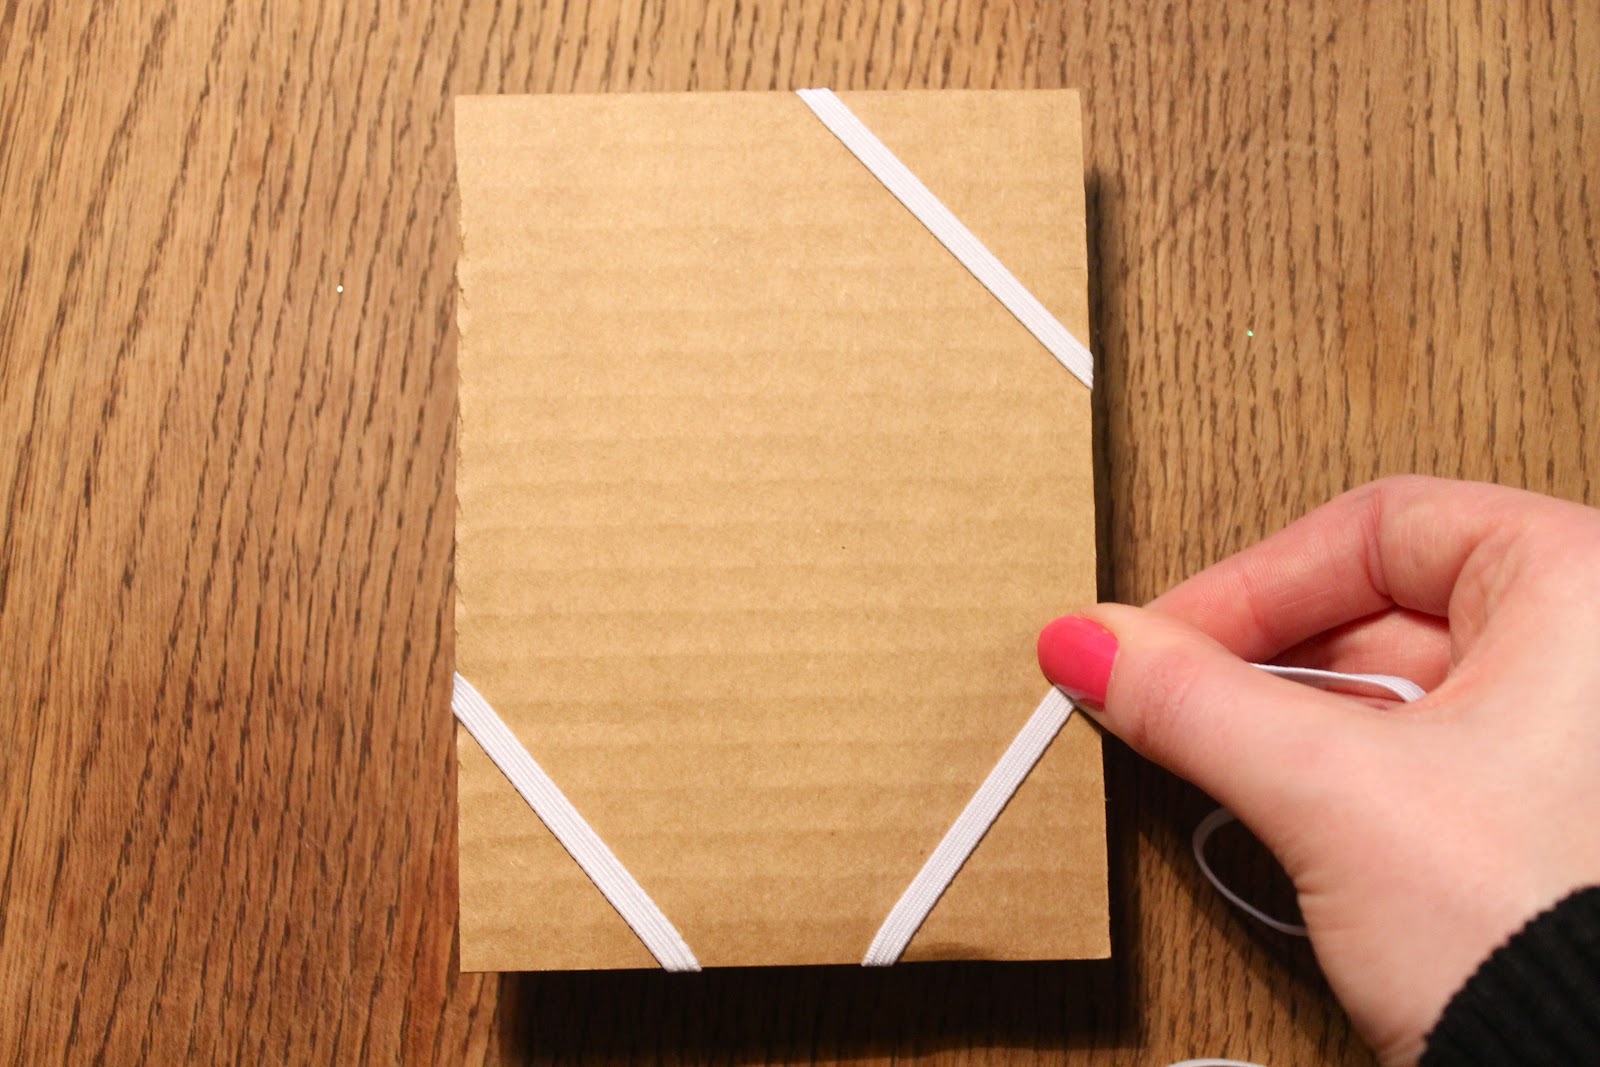
Here is the fiddly bit, you need to make your elastic corners, so you need a nice long piece of elastic. The picture below shows the back of the inside panel when complete. I have used the glue gun to glue each piece of elastic on the back.

Below is the step by step process to create the corner straps. I forgot to photograph this originally so I just used a piece of card for you to get the gist. Between taking each photo I turned the card over.


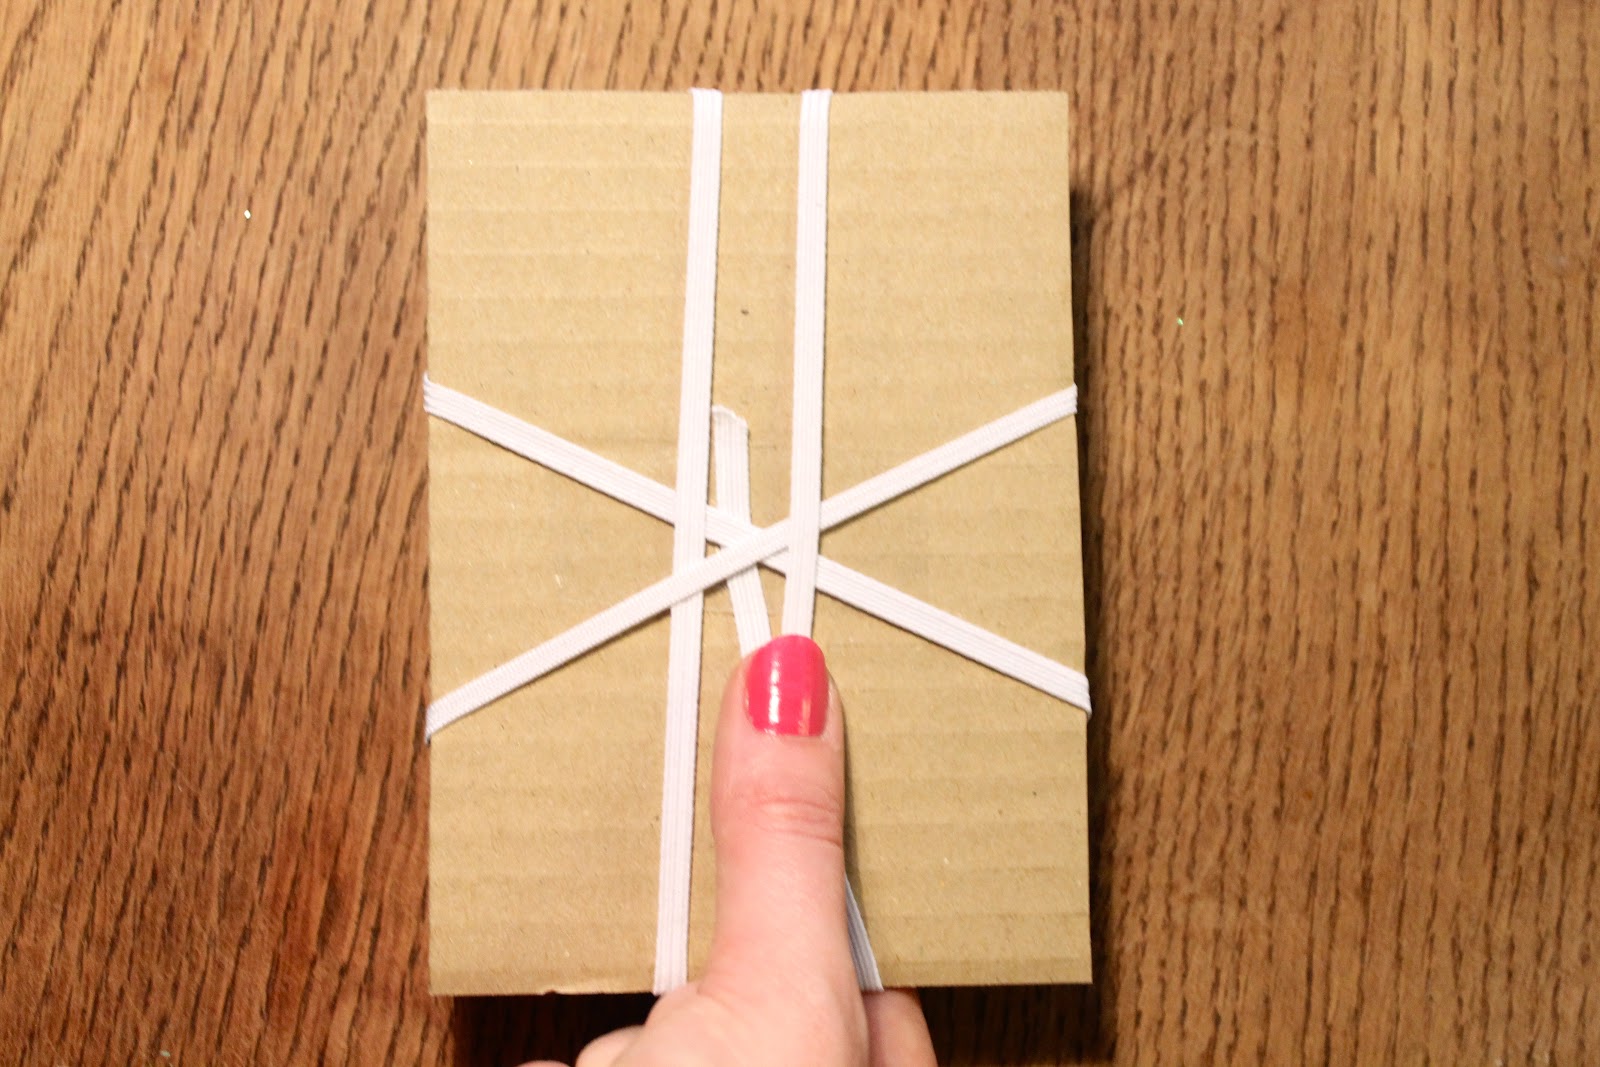
You can adjust the corners bit by bit as you go. When you get to the end untape the end of the elastic, and tie the two ends together. At this point you use the glue gun to stick it all securely to the back. Before I did this I placed the kindle in the holder to make sure it all fitted. I actually then left it there until the end of the process, but be careful not to get glue on it! Finally you will need to glue the panel to the middle piece of your base. Just use your glue gun to go around all 4 sides of the rectangle, then place and hold in the middle for a minute until it is dry.

To finish the whole thing off you will probably want to create a fastening. I just found some velcro, cut it into circles, then used the glue gun to fix it in place.

The great thing about this is that you can stand it up, both horizontally and vertically!


Laura xXx


laura this is amazing! love the fabric choice too :) you must be super proud of this, so clever! x
ReplyDeleteThanks Skye, I am very pleased with it, it was all a bit of trial and error really, but it seemed to work out great :)
DeleteGenius! I like how it's a stand and a cover at the same time... and the fabric... love it!
ReplyDeleteThanks, it was a bit of luck that it worked out that way :)
DeleteAbsolutely fab!!! Love it!
ReplyDeleteJo :-) x
adventuresandteaparties.blogspot.co.uk
Was wondering what you intended to do with that fabric on your last post. Great job, love the way you can make it stand up.
ReplyDeleteThat's amazing! What a beautiful (and functional!) cover for your lovely new kindle :) Great work! x
ReplyDeleteThanks :)
DeleteThat's amazing, next time you should do a video so it is less confusing. (:
ReplyDeleteThats a good idea, if i make another one i will do! :)
DeleteI'm quite impressed! I might have to try this as well.
ReplyDeleteLet me know if you do :)
DeleteThat is stunning! I still stick to good old fashioned books, but I still love this DIY:)
ReplyDeleteblueeyednightowl.blogspot.com/
I love real books too, but once i have bought them i can't part with them and i was concerned i was becoming a hoarder. Now i can hoard them on my kindle and its much tidier! haha
DeleteAnd the Kindle saves space and weight in my carry-on luggage. Three books vs one Kindle on a carry-on? No question there.
DeleteThis is so great !I loved it ! Thanks so much for sharing !
ReplyDeleteI was trying to buy a case and none of them were all that awesome, so decided to make my own. You tutorial is precisely what I wanted since it incorporated real sturdy backing and can be used as a stand! Thanks for making this !
ReplyDeletethis is great, thanks!
ReplyDeleteThank you so much! I love this tutorial because you don't need to be a professional with high quality supplies to make this. It's perfect, and you can use it as a stand too!!! ahhh! I love it! I have to try this when I have some free time :D
ReplyDeleteThanks for sharing, I have just finished it. :-)
ReplyDeleteHere is my case: http://www.cicvarekkuckoja.hu/cicblog/?p=2342
Aw, that looks fantastic! Really glad my tutorial helped! :)
DeleteHi! Just wondering how you sealed up the top after inserting the cardboard pieces? Thanks!
ReplyDeleteHi Laura, please I need some help! I have a tablet (samsumg smt 700) and it's 30 x 12.5 x 6.6 cm, what sizes of cardboard do I need? for some of them I'd like to use a 3 ring old binder. Thank you! Estela.
ReplyDeleteone doubt would the feature of flip cover work with this ?.I mean would the screen go dim if we close it?
ReplyDeleteI can't wait to try this out. I'd been using a generic case--not the best fit, but it worked--but a can of soda spilled on it. My Kindle Keyboard is fine, the case did its work and went in the trash.
ReplyDeleteI play word games and need a case that actually folds flat in my hands. This looks perfect.
Thank yo so much! So gonna try this out! ( after I find a beautiful piece of printed cloth, of course!)
ReplyDeleteMade it. Love it. Thanks!!!!!
ReplyDeleteExcellent tutorial! Almost finished and very happy. Thank you sew much!
ReplyDelete